Imagine we want to build a house. When we begin laying the foundation, it’s natural for the soil below to undergo some initial settlement. However, it is essential that this settlement remains within acceptable limits and doesn’t lead to future problems.

That’s why, before constructing the house, we must ensure the soil beneath is stable and strong enough to support the structure and manage the expected settlement effectively. Engineers and builders have to consider this settlement when constructing engineering structures such as roads, dams and building. They take measures to make sure that such structures are safe and don’t get damaged by undesired settlement. The process of making the soil base solid before the construction is called compaction.
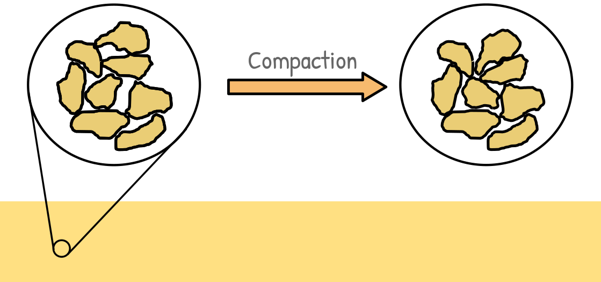
Compaction is the process of application of mechanical energy to the soil. Because of this soil grains get rearranged more closely, the volume of air voids get reduced and the density of soil increased. Higher the density of soil, stronger the soil is. By strong we mean it has higher shear strength and bearing capacity.
We have discussed all these in a little more detail in our previous post. You can read that by clicking this link.
Compaction is usually done with heavy machinery and equipments, such as vibratory compactors, rollers, or compacting plates.

By doing compaction for many years now, we found that if we add a little water to the soil and then try compacting it, it gets better compacted. Because water acts as lubricating agent between the soil particles. When the load is applied to the soil, the water between the soil particles helps them move more easily and helps soil achieve denser configuration.
But how much water we need for a good compaction? And what is a good compaction? How do we know we have done enough? Or we need more of it? Is there any way we can quantify the compaction?
Well, Yes. The amount of compaction is measured by the Dry Density of the soil. Higher the dry density, higher is the compaction.
Dry density is the density of soil when soil is in completely dry state which means no water is present in its pores. So the Dry Density of soil is mass of soil solids only divided by its volume.
To assess the amount of compaction and the water content required in the field, we perform laboratory tests on soil. These tests provide a relationship between the water content and the dry density of soil.
Typically the procedure is that, that we collect a soil sample from the site and perform laboratory tests on it. We obtain results that are satisfactory to us for the level of compaction we require. Then we perform compaction in the field and during the process we perform tests in the field to verify that compaction in the field is consistent with the lab results.

One such laboratory test that is used to determine the amount of compaction and water needed for different types of soil is Standard Proctor Test.
Standard Proctor Test
American civil engineer and soil scientist Ralph Roscoe Proctor developed the principles of soil compaction.  He found through his experiments that the dry density of a soil for a given compactive effort depends on the amount of water the soil contains during soil compaction. In even simpler words he found a relationship between the dry density and the water content of soil.
As a tribute to Proctor the laboratory test that he devised is called Standard Proctor Test or Proctor Compaction Test. In this test specified amount of compactive effort is applied to a constant volume of soil mass.
For the test we use a standard mould of internal diameter of 4 inches (101.6 mm) and an effective height of 4.584 inches (116.4 mm). Its standard volume is 1/30 cubic foot 944 cubic centimeters (cm³). It also has a detachable base plate and a removable collar of 2 inches height at its top.

We collect a soil sample of about 15 to 20 kg from the field. We air-dry the soil and remove any organic material or debris present in it. Then about 5 kg of the sample is crushed and passed through 20 mm sieve so that we can have a uniformity in our sample.
The soil passing through the sieve is taken. We add a little water to the soil so as to bring its water content to about 4%, if the soil is coarse-grained and to about 8% if it is fine grained.
How do we know how much water is needed to bring the required percentage of water content? Well, water content is weight of water divided by weight of solids present in the soil.

So weight of water can be calculated as water content multiplied by weight of solids.
![]()
The soil is mixed thoroughly and covered with a wet cloth and left for maturing for about 15 to 30 minutes. During this period, the maturing period, soil is allowed to absorb moisture uniformly after mixing.
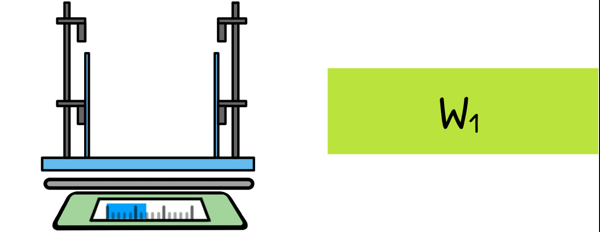
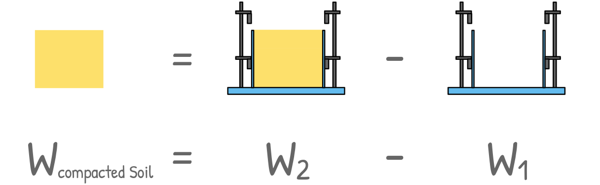
The mould is cleaned, dried and greased lightly so that soil does not stuck with the mould. The weight of the empty mould with the base plate, but without collar, is taken and noted down as W1.
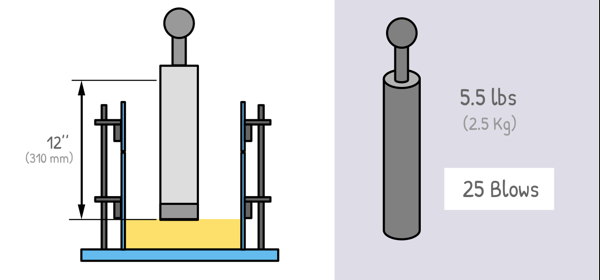
The collar is then fitted to the mould and it is filled with soil to about one third its height. The soil is compacted by a rammer of weight 5.5 pounds (approximately 2.5 kg). It is allowed to fall freely from a height of 12 inches (310 mm). 25 numbers of such blows are given and they should be evenly distributed over the surface of soil.
Then before adding the the second layer of soil, we scratch its surface with a spatula. We fill the mould with soil to about two-third of its height and compact it in similar way by 25 blows of rammer.
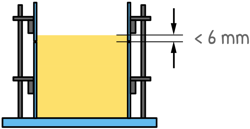
Again soil surface is scratched and the third layer of soil is placed into the mould. The final layer should project a little above the top of the mould in the collar by not more than 6 mm. The layer is compacted in the same way.
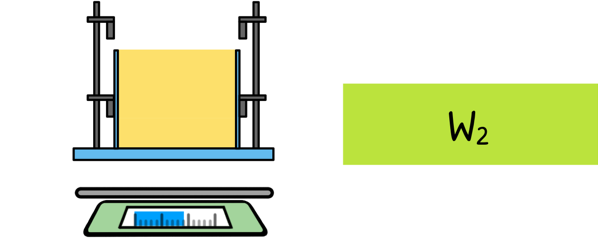
Then we remove the collar and trim the excess soil off. The mould, with the base plate is weighed and noted down as W2.
Hence we can determine the weight of the compacted soil as W2 – W1.
At this stage we know the volume of mould and weight of the compacted soil, so we can calculate the bulk unit weight of this compacted soil.
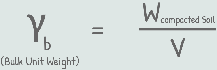
where W is weight of compacted soil is in KN
V is volume of the mould in m3
We take representative samples from the bottom, middle and top of the mould and determine the water content of the compacted soil by any of the water determination methods.
Once we have the bulk unit weight of the compacted soil and its water content, we can calculate its dry unit weight by a known relationship.

The soil is removed from the mould and is broken with hands. We add more water to the soil so as to increase the water content by 2 to 3 %. It is thoroughly mixed and allowed to mature. The whole procedure is repeated and the dry unit weight and the water content are determined. We keep on increasing the water content and determine their respective dry unit weights.

We plot these obtained values of dry densities against their respective water contents. And when we join these points together, we obtain a curve which is called the Compaction Curve. Each plotted point on this curve is one Compaction Test.

In the curve we can see that with the increase in water content the dry unit weight of soil initially increases till a maximum value of dry unit weight is attained. And if we keep on increasing the water content, the dry unit weight decreases.
This maximum value of dry unit weight that a soil achieves is called Maximum Dry Unit Weight and is usually denoted as Yd(max). It is also called Maximum Dry Density (MDD) of soil. Though this is not the Density but it is common in Soil Engineering to use these words, Unit Weight and Density, interchangeably.
The water content at which the Maximum Dry Density is achieved is called the optimum water content or the Optimum Moisture Content (OMC).

To the left of Optimum Moisture Content, the moisture content in the soil is less then the optimum and this side of the curve is known as Dry of Optimum. Simply because the soil is drier than the ideal moisture content for achieving maximum compaction. In this region the soil is rather stiff and has lot of void spaces. Therefore, the dry density is low.

As the water content of the soil is increased, it acts as a softening agent on the soil particles. When load is applied they slide over each other more easily, and move into densely packed positions. Hence with the increase in water content the dry unit weight of soil increases.
However, to the right of the Optimum Moisture Content, water content in the soil is more than the optimum and this side of the curve is known as Wet of Optimum. When we keep on adding the water to the soil even after Optimum Moisture Content, the added water results in a reduction in dry unit weight because the pore water pressure (the pressure of water in-between each soil particle) will be pushing the soil particles apart, decreasing the friction between them. Also the extra water occupies the space that might have been occupied by soil particles. Hence again, the dry density of soil becomes low.
We should note that this curve is unique for a given soil type, method of compaction and compactive effort. It means if we keep the soil and method of compaction unchanged but the compactive efforts are increased or decreased the compaction curve will change.

Also if we keep the the compactive effort unchanged but change the soil, the curve will change. Hence any particular compaction curve is unique for a particular soil, method of compaction and compactive effort.

In the curve we can see that at this water content soil has achieved Maximum Dry Unit weight or Maximum Dry Density. However, it’s important to note that even at this water content, some voids remain within the soil.

In fact, no amount of compaction actually removes all the voids from the soil. But if we remove all the air voids from the soil theoretically, the theoretical maximum value of dry unit weight at this water content can be obtained. At this stage soil is completely saturated and the Degree of Saturation is 100%. Keep in mind that we are not increasing the water content to saturate the soil, we are theoretically compacting the soil even more to loose all of its air voids.
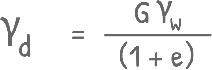
To obtain theoretical maximum value of Dry Unit Weight at this or any other water content, we begin with expressing the dry unit weight as a function of the void ratio
This is a pre-established equation derivation of which can be found in our earlier post.
We are also aware with this relationship
![]()
and derivation of the same can also be found in that same post.
from this equation we can write it to find void ratio like this.

and by substituting it in this equation γd can be written as this.
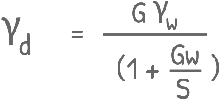
In the equation γw is known as it is the unit weight of water. S is Degree saturation and is 100% for calculating maximum value of Dry Unit Weight. Hence, we can calculate Theoretical Maximum Dry Unit Weight of soil for any value of water content if value of G is known, which is specific gravity of solids.
The line indicating the Theoretical Maximum Dry Unit Weight can be plotted along with the compaction curve. It is known as Zero Air Void Line or 100% Saturation Line. We must keep in mind that this curve or line representing 100% saturation is a theoretical limit and is never reached in practice as we have already stated earlier that it is not possible to remove all the air voids from the soil.

One more important thing, when the compactive efforts on soil is increased and a compaction curve is obtained, we observe that the curve has shifted a little upwards and to the left. For different compactive efforts we notice similar shifting of the curve. And when we join the peaks of these compaction curves, a Line of Optimums is obtained.
Well that is Standard Proctor Test and analysis of its results.
The purpose of this test to find out the Optimum Moisture Content at which soil achieves its Maximum Dry Density or Maximum Unit weight. Then in the field our goal is to achieve soil density as close as possible to the Maximum Dry Density obtained via laboratory test.
Light Compaction Test
In India the Indian Standard recommends a test for compaction that is equivalent of the Standard Proctor Test and is called the Light Compaction Test. There are only minor modifications to the test.
It recommends the mould of 100 mm diameter, 127.3 mm height and 1000 ml capacity. Also the rammer is of 2.6 Kg and the free drop is 310 mm.

It was observed that Standard Proctor Test is better suited for smaller projects like construction of small building, garden pathway, small retaining walls etc where loads on the soil are not substantial.
But for projects that need heavy compaction of soil such as construction of highways, dams etc, the Standard Proctor Test does not represent the true compaction characteristics.
For such conditions the Standard Proctor Test has been updated into the Modified Proctor Test and that we will discuss in the next Post.